DIY Electrical: Installing a Ceiling Fan
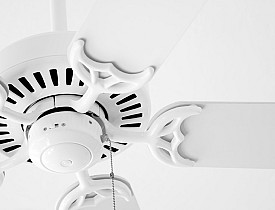 Replacing an existing light fixture with a ceiling fan is only slightly more challenging than installing a light fixture. While it is best to leave complex electrical projects to licensed electricians, do-it-yourselfers with electrical experience often tackle ceiling fan installation themselves. The tricky parts involve purchasing the right sized fan and lifting the sometimes heavy motor unit in place. If you have installed light fixtures, you'll do fine with a ceiling fan installation.
Ceiling fans are an unobtrusive and economical way to cool a room in summer and move heat back down to floor level in winter. For best air flow, locate a ceiling fan in the midpoint of the ceiling. If the existing light fixture is off center but close to center, it is easier to use its wiring than to install a new box and wiring.
How Low Can You Go?
Determine how far down your fan will hang once mounted. Measure from the floor to the ceiling and subtract the fan measurements. For safety reasons, the result should be at least 7'. The fan blades should also be at least 12" below the ceiling with an optimum distance of 18".
Preparation for the Ceiling Fan Insatallation
Begin by turning off the power at the panel or by unscrewing the fuse in older systems. Never trust the switch alone to turn off the power. Remove the existing light fixture. Since each fan may be different, refer to the installation guide included in the fan kit.
Consider using a fan support unit that can be inserted through the existing metal junction box hole. Do not install a ceiling fan to a plastic box since it will not be strong enough. Always use a metal junction box to support a ceiling fan. If your fan is heavier than 35 pounds, you will need to secure your fan via a beam or other support, not a junction box.
Install the hook or hanging support and hang the housing unit. If the fan requires a hanger pipe, thread wires through the pipe. Attach the pipe to the box and fan per manufacturer's instructions.
Assemble the Ceiling Fan
If the space between the ceiling and the blades is shorter than a screwdriver's length, attach the blades to the fan before hanging the fixture. Follow the manufacturer's instructions to attach the blades and install decorative pieces.
How to Mount the Ceiling Fan
- Remove the existing light fixture, if there is one. A preexisting light fixture gives you the advantage that there should already be a metal junction box in the ceiling where you can install your ceiling fan. If not, install a metal cross brace through a rough opening in your ceiling and then attach an approved workbox to the brace.
- Install the hanger bracket to the box with screws and lock washers. Use lock washers to prevent the fan's vibration from loosening the screws.
- Connect the wires by matching black to black and white to white by twisting to the right with wire nuts. Wrap with electrical tape.
- Ground the fan to the box. A grounding wire is either green or a bare copper wire. Using a wire nut and twisting right, connect the ground wires from the box and the fan together. Wrap each wire nut with electrical tape and gently push wiring inside the box.
- Attach the blades if you haven't already done so and finish by installing any other decorative pieces.
Ceiling fans are an economical way to reduce heating and cooling costs. Careful do-it-yourself weekend warriors can take on a ceiling fan installation and enjoy year round comfort. If you're not the DIY type or you'd like to save time, hire a professional electrical contractor; you'll have the peace of mind of knowing your fixture is installed according to building code.
Updated November 29, 2018.


Looking for a Pro? Call us (866) 441-6648

Electrical Average Costs
Electricians Experiences
A Simple HVAC Repair Stopped Our Air Conditioner Blowing Hot Air

My Remodeled Bathroom Is Modern, Clean And Beautiful