Staining and Painting Wood Cabinets
 Finishing new wood cabinets (or refinishing old ones) is a great way to save money when updating your home. This is particularly true in the kitchen, which has so much cabinetry. No matter where your wood cabinets are located, you are going to have to invest some time if you want professional results. For a single cabinet, a weekend will suffice. Do-it-yourselfers who work on projects on weekends and evenings should plan for more than a week to refinish multiple cabinets.
Advantage of Purchasing Unfinished Cabinets
For those who purchase unfinished cabinets, the job will be easier. There is no grime, clear coat or stain or paint to remove. You won't have to remove doors and hardware. In fact, the cabinets are likely sanded and ready to be primed for paint or conditioned for stain. If you are refinishing cabinets, you'll have to do all of those things.
Two Ways to Finish Cabinets: Stain or Paint
Staining and painting are the two ways to finish cabinets. There are a host of techniques that can be used to add texture and depth.
Can homeowners achieve a right-off-the-showroom-floor look when doing it themselves? They can get close, but most manufacturers include a baking process for maximum durability and shine. People rarely understand the time and effort that must go into staining and painting for a professional-looking finish. Here's a very basic look at the detail that goes into each method, as well as some decorative effects that can be employed to add visual interest.
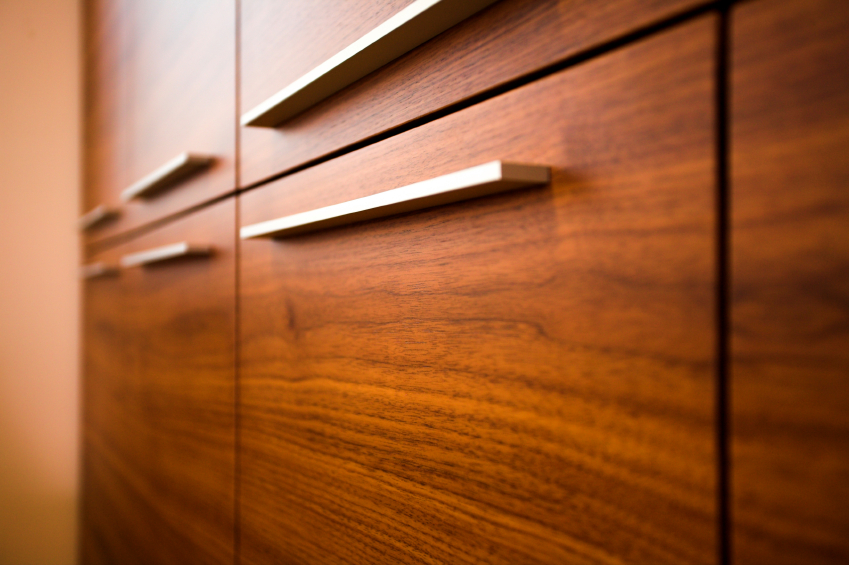
Stain
Of the two ways to finish cabinets, staining is significantly more challenging. Practice on samples before you tackle the actual cabinets. If you don't feel confident, hire a professional refinisher and you'll still pay a fraction of the cost of buying new cabinets. Staining a large set of cabinets will be time consuming.
- Work safely: Be sure to follow the manufacturer's safety instructions regarding the use of gloves and ventilation for all products used.
- Prepare: Empty all of the cabinets and remove doors, drawers, shelves and hardware. (Label everything so you know where it all goes.) Clean the pieces with warm, soapy water. Use a special cleaning agent for kitchen grime. Clean and dust your work area.
- Strip: First strip off the clear coat. Then strip the paint or old finish.
- Sand: While stain will bring out the beauty of the grain, it will also highlight any scratches. Start with a 100-grit paper and sand again using finer grits, such as 120 and 180. Each sanding will reduce blemishes and scratches.
- Condition: Many woods absorb stain unevenly. A wood conditioner such as beeswax will help the stain go on evenly. Clean the wood and surrounding areas of sawdust and allow time for settling before you begin to stain.
- Stain: Stir the stain and be sure to keep it well mixed so the pigments are dispersed evenly. Better yet, work with a gel stain, which doesn't need stirring, is neater and is good for vertical applications such as cabinet faces. To ensure all pieces are uniform, the same person should apply and wipe the stain after letting it sit for the same amount of time.
- Sand: After the stain has dried, sand lightly with 220-grit paper.
- Get the desired color: Repeat the stain application and sanding until you get the desired color. It's wise to do this process on sample wood first and note how many repetitions you need to achieve the desired result. Keep the woodworking steps consistent for uniform results.
- Clear coat: Apply polyurethane coat, let dry and sand with 220-grit paper. Repeat two more times.
Can you stain over an existing stain? Yes, but only if you are going darker. Try it on the back of a door or an inconspicuous spot. After you clean the piece, rough it up with sandpaper and wipe well with tack cloth to clean dust and particles. Proceed with staining. This will eliminate the initial sanding process.
Paint
Painting is much easier and takes a shorter time than staining. Plus, less skill is required. Oil-based primers and paints are recommended for kitchen and bath applications because they provide a hard, durable finish. If you don't have the time or desire to refinish cabinetry yourself, you can hire a professional painter to do the job.
- Prepare: Just like staining, getting a polished look is dependent on preparation. Empty the cabinets and remove hardware, drawers, doors and shelves. Clean the cabinets well. Soap and water will suffice for cabinets in the bedroom or living room, but use a special degreasing product for kitchen cabinets.
- Sand: Prepare for primer by roughing up the surfaces with 100-grit paper.
- Prime: Paint one or two coats of primer. Let doors dry flat so the primer dries level.
- Sand again: Sand using 120-grit paper to remove brush strokes. Use a fine-grit sponge and sand until the base coat has no grain marks.
- Paint: Use a good-quality brush or a spray painter. Apply two coats if necessary.
Add Decorative Cabinet Effects
Homeowners seeking to add a little pop to their cabinets can use a finishing technique to change the basic look. Glazing is the most common way to highlight cabinet details. By applying a glaze and wiping it off, the details of a cabinet are highlighted. Finishes, such as crackle, distressed or antique, make a bold design statement and are appropriate on a smaller set of cabinets or a single cabinet, such as a bathroom vanity.
If you do decide to finish on your own, be sure to take your time so you get impressive results. With the money you save you can buy attractive new hardware that will make the cabinet(s) look brand new!


Looking for a Pro? Call us (866) 441-6648

Painting Average Costs
Painters Experiences

I Appreciate My Painter For All The Things I DIDN’T Have To Do
Choosing A Professional House Painter, My Way