Roof Sealant Application
 In the world of home construction, repair, and remodeling, the roof seems like a pretty straightforward part of the equation. There aren’t any electrical wires to work around, no plumbing to access or upset, no complicated intricacies to accommodate. Just roofing material. Easy installation. Simple.
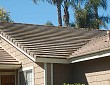
Of course, there are a few little added extras that most people overlook when considering the ins and outs of roofing, which will mostly depend on the type and shape of the roof. For example if you want to use a metal roof, or if you happen to have a flat roof, or if you live in a particularly extreme climate, you probably want to consider a quality roof sealant.
Roof sealants simply help to protect against the weather – to aid in leak prevention and to minimize UV damage. Rain, especially on flat roofs, can lead to pools of standing water. This makes the roof more likely to leak, and more prone to other types of water damage. Conversely, in the hot hot months, the roof can warp, bleach, or crack. This can also give way to leaks once the rain returns.
So what about roof sealant application? Well, first you’ll need to select a sealant that works with your roofing materials, as well as with your surrounding climate. Not all sealants are safe for use on all roofs, so make sure you know what product you need before you begin. You may want to consult a sealant specialist at your local home improvement center.
Never use a sealant on a damaged roof. If your roof leaks, or is missing shingles, or shows signs of sun damage, then you need to make the repairs prior to applying the sealant. You can use patching cement to cover any exposed seams, screw heads, and flashing. This will help prevent leaks because these are the areas most prone to leaking. Use a stiff-bristle paint brush to apply the patching cement.
Roof sealant application should always be performed on a well-cleaned and completely dried roof. It’s best to work on a dry day, not too cold or too hot if possible, since extreme temperatures may alter the sealing process.
Sealing the roof using a standard sealant is actually a pretty simple process. Use a paint brush or roller to apply the product. Position two ladders, one at each side of the roof, so that you do not have to backtrack across the wet sealant when you’re ready to climb down. Work from one side of the roof to the other, covering the area completely, top to bottom. Allow to dry and apply a second coat if necessary (check the manufacturers info).
There are various grades and styles of sealants which come in different forms, and not all of them are as easy to apply. In some cases it may be best to hire a contractor or handyman, depending on your skill level and comfort. It’s important to research which sealant will be best for your needs, and then proceed as necessary. Whatever you decide, there’s no doubt that sealing your roof is an important step in preventative home care, and you’ll be making an investment in the long-term viability of your roof.
Sayward Rebhal writes for Networx.com.


Looking for a Pro? Call us (866) 441-6648

Roofing Average Costs
Roofers Experiences
Partial Siding Replacement To Get Rid Of Dry Rot

Come See My New Metal Roof! It Is Fantastic!