DIY Painting Project: Subtle Stripes
 A few years back my husband and I bought our first house. It was new, and it was very . . . cookie cutter . . . which meant it required a massive remodel. Instead of hiring a Portland remodeling contractor, we did all the work ourselves, room by room.
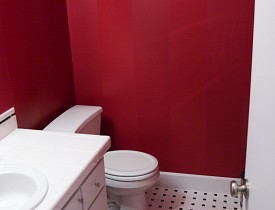
It was fun! And we learned so much. One of my very favorite projects, and our first complete room makeover, was our small downstairs half-bath. We wanted to do something bold, but the size of the space was too small for “busy”. We considered a simple wallpaper, but worried about the long term repercussions, should we ever change our minds (as we creative types are wont to do). I like things a bit more on the baroque side, whereas he is all about clean and modern. With that in mind, we devised a plan that would meet in the marvelous middle – and that’s how we ended up with these eclectic-yet-elegant stripes.
We went with a bright red, which took the look squarely into the realm of “funky”. However, the same technique applied in cream, ivory, taupe, or sage, would offer a much more refined vibe. Pastels would be perfect for a nursery, bright colors best for child’s room, and I think the treatment would be striking on an accent wall. However you choose to use it, here’s how it’s done:
1. Tools
For this project, you will need brushes/rollers, painters tape, drop cloth/plastic, and 2 buckets of paint in the exact same color – one in a matte finish and the other in high gloss.
2. Prep
Begin by prepping as you would for any painting project. Tape of the ceiling and trim, lay a drop cloth, and apply a coat of primer.
3. Matte Base
Once the primer has dried, apply a coat of the matte paint. Wait for it to dry completely, then add a second coat. Depending on the color, you may need to use a third coat (if you didn’t use a tinted primer), but it’s up to you.
4. Measure
Decide on the width of your stripes. We chose ones that were quite wide, 10 inches to be exact. Thinner ones would look lovely, but would feel busier. Again, it’s all up to you. Measure and mark with chalk, both at the top and at the bottom of the wall.

5. Tape
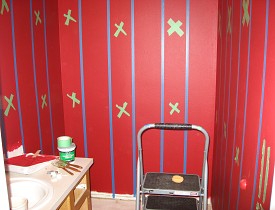
Use the chalk marks at the top and bottom as guides. Stretch the tape as tight as you can to get a perfectly straight line. REMEMBER – in order for the stripes to be the same size on the finished wall, you’ll need to lay the tape on the “outer edge” of the chalk mark, alternating as you go. This will result in what looks like wide stripes and narrow stripes after the taping is finished. We also found that it helped to make X’s on the narrow stripes so that we didn’t accidentally paint them.
6. High Gloss
Apply the high gloss paint to the wider stripes. Allow to dry completely. You probably only need one coat, since the base beneath is the exact same shade.
7. Finish up
Peel all the tape up, including the ceiling, trim, and stripes. Be very careful as you peel!
Stand back, marvel, and enjoy your totally unique, totally DIY wall treatment.
Looking for a Pro? Call us (866) 441-6648

Painting Average Costs
Painters Experiences

Interior Paint Job To Prepare For Move-In Day

Painting My Stem Wall Took Half A Day Of Meticulous Work


