Replacing Gutters and Fascia
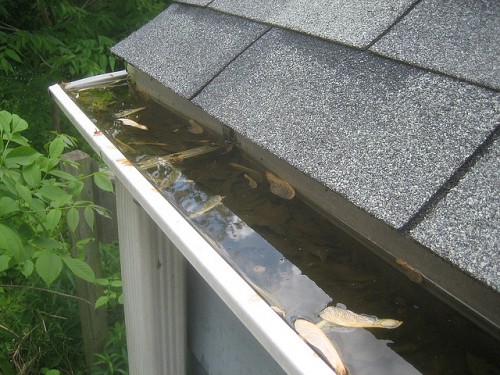
All that water on your roof has to end up somewhere, which is where your pals the gutters come in. Collecting and diverting rainwater ensures it won’t end up soaking into the wood at the end of your roof or around your foundation, where it could cause rot and related problems. It’s a good idea to keep your gutters clean so they can work effectively, but every now and then you might need to completely replace your gutters and fascia, the boards that back them and offer protection to what are known as the rafter tails. (That’s a fancy way of saying “the sticky-out bits of your rafters.”)
Find an assistant
While this home improvement project is totally doable even if you don’t have a lot of experience, we recommend getting an assistant because you'll have to do a fair amount of cutting components to size, and a lot of things need to be held up at various stages. Two capable assistants would be even better, and would help the job go faster. If you’re not feeling totally confident, consider hiring a professional handyman to help.
Assemble your supplies
For replacing gutters and fascia, you’re going to need a power saw, fasteners (screws are a good idea), brackets and gutters, a drill, new fascia pieces, aluminum strips and snips, and ladders or scaffolding. For projects like this where you’re going to be working up high for a prolonged period of time, scaffolding is a better choice than a ladder because it’s safer and easier to use. You can rent scaffolding if you don’t own some.
Remove old gutters and fascia
Start by removing the old gutters and fascia. Sometimes your gutters may be worth preserving, but if they are heavily sun-damaged, rusted, or otherwise compromised, throw them away. Next, investigate the underlying fascia. Chances are high you’ll need to replace some or all of the boards. If they’re obviously crumbling or warped, gently pry them off, and try to keep them intact, because you can use them as templates later. If a board looks sound, probe it with a screwdriver to be sure. You may find the wood is rotten underneath the paint.
Cut and install replacement fascia boards
Once you’ve removed all the damaged fascia, cut new pieces to size using all those handy templates you retained. When the boards need to round a corner, cut the edges at 45 degree angles so they will nest up tightly. Next, install the fascia, drilling screws into the rafter tails through the boards. You may notice that some of the rafter tails are also damaged, especially if there’s been extensive leakage. In this situation, you can attach lengths of wood along the rafter tails to anchor the fascia, but if the damage looks considerable and might stretch up into the rafter, it might be necessary to talk to a contractor to determine whether the wood needs replacement.
Mark gutter placement
Once the fascia are in place, you can paint or seal them to match the trim and protect the wood before you use a measuring tape and chalk line to mark out the line for the gutters. You want to gutter to drop one half inch every ten feet so the water will drain, and if a gutter runs for more than 40 feet, consider splitting it so the water can drain evenly. You can either have the gutter higher in the middle, draining to two downspouts on either end, or you can have the two lengths of gutter run into a downspout in the center, depending on how it will look and your preferences.
Attach brackets and install new gutters
With your path marked out, it’s time to start attaching brackets. Anchor those to the rafter tails, and make sure they’re evenly placed along the chalk line. Once they’re done, you can start installing the new gutters, cutting them to length as needed.
If you need to join two pieces to make a length, overlap them by an inch and screw or rivet the pieces together along the sides. (Not the bottom, which would just invite a leak!) To round a corner, cut edges to 45 degrees and put the gutter in place. Then install an aluminum strip miter at the bend, by pressing a piece of aluminum into the gutter, wrapping it up the sides, and cutting a small triangle out of the remaining flap, point down. This creates two flanges you can wrap around the gutter to secure the miter (which you may disguise by painting to match the gutter). If this is a little too advanced for your taste, buy connecting pieces that match your gutters. Use caulk to finish any rivets or screw holes, including those made when you connect the gutter to the bracket, to reduce the risk of leaks.
Install downspouts and end caps
Downspouts and end caps are the last part of your project. Install downspouts at the end of the gutters and make sure they are directed well away from the foundation, and finish off each gutter with an end cap so water doesn’t spill over the edge.
Read about the cost to install gutters.
s.e. smith writes for Networx.com. Photo by Akeg/Flickr Creative Commons.


Looking for a Pro? Call us (866) 441-6648

Roofing Average Costs
Roofers Experiences
New Asphalt Roof For My House And Shed After A Storm Blew Off 21 (!) Shingles
Our Metal Siding Replacement Is Getting Lots Of Compliments