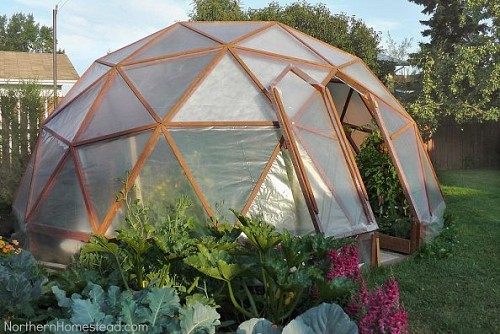
Build a Geodesic Dome Greenhouse!
So I hear you want to build a greenhouse. You're tired of this frigid weather, you want to get some starts going early, or maybe you just have a hankering to plant a few things that prefer to grow in warmer climes. Whatever your reasoning, you're probably daunted by all the options available when it comes to building greenhouses and hoop houses for your garden. Which is why I think you might be intrigued by this geodesic dome greenhouse tutorial featured on Hometalk.
Advantages of Dome Greenhouses
Before we delve into the specifics of how to build your own greenhouse in this distinctive shape, it's worth taking a moment to talk about why you might consider it (aside from the fact that, hey, domes look cool). This construction method is highly efficient, able to contain a large volume with a relatively small surface area, so you'll spend less money yet have a bigger space. In addition, the geodesic dome shape handles high winds better than others, which can be a concern for greenhouses; though their lightweight design can make them vulnerable to storm damage, domes tend to be more sturdy.
How a Dome Design Works
The dome design works by setting up a series of struts connected into triangular shapes which are in turn bolted together to create a spherical shape. To build one, you're going to need wood lengths, greenhouse plastic, screws, hinges, and latches. If you want something a little fancier, you can get an automatic opening system for windows (to open and close them automatically according to heat and humidity conditions in the greenhouse).
Supplies You'll Need
The tools you'll need include a saw, screwdriver, level, marking pencil and square, and measuring tape. As always, we recommend using hearing protection and eye protection while working with power equipment!
Use a Geodome Planner
Anna at NorthernHomestead recommends using a geodome planner, a layout tool that will help you determine the number of struts you need and their length. You'll need to determine the best geodesic frequency (the number of smaller triangles each larger triangle is divided into -- higher frequencies are more stable and result in a more spherical shape) and you can plug it into a planner to get a rough design for your greenhouse.
Assemble the Framework
Next, cut your struts, creating a pointed end on each (some hardware stores can do these cuts for you, but make sure they're accurate, as miscuts could cause problems during construction). Then start assembling the struts to create the framework of the dome. Those pointed ends will slot right together in a neat pattern for strong miter joints. Anna suggests installing a "pony wall," a partial wall that will give you some height and an even base for dome construction. Make sure you leave room for a door (hey, we had to remind you...) and windows.
Cover the Dome
Once the dome is constructed you can cover it, attaching your chosen covering material with staples or other fasteners. If you want to make sure it's really firmly attached, use thin strips of wood or plastic on top to create a sandwich between the covering material and the underlying struts. Then you can install your doors and windows...and enjoy your greenhouse.
Need Some Help?
Are you nervous about tackling this project on your own? Why not ask a professional carpenter for help!
Katie Marks writes for Networx.com.
Updated October 3, 2018.
Looking for a Pro? Call us (866) 441-6648

Landscaping Average Costs
Landscapers Experiences

Oak Tree Planting Looks Great In Our New Home’s Spacious Yard

Successful Removal Of A Very Large Tree


