Triage for a Dripping Faucet
 Giving advice for fixing a faucet is a little like telling someone how to repair a car: unless you're dealing with a specific model and year, you have to keep things pretty general. That said, the countless different shapes and styles of faucet parts can be grouped by function, and you follow the same basic steps to get inside almost any faucet. Once you're in there, fixing it is merely a matter of finding the right replacement parts. And, of course, putting it all back together properly. On that note, there's no better advice to offer than this: Pay attention to how everything looks before—and while—you take it apart.
Pinpoint the Problem
If the water drips out of the spout, as though you can't turn it off all the way, you have a bad valve, or valve seal, under the handle. Feel the water to see if it's warm or cold; this tells you which handle has the leaky valve. On a single-handle faucet, the warm and cold inlets each have their own valve parts, but you'll want to replace both regardless of which one is bad. If the faucet is leaking at the base of the spout, a common problem with kitchen faucets with swiveling spouts, the leak is likely due to a bad O-ring under the base of the spout (the rest of this article applies to your problem, too).
Turn Off the Water
This is the step Mr. Bean would surely forget, leading to a small flood in the kitchen. Don’t be Mr. Bean. Open the cabinet under the sink and find the little football-shaped knobs on the valves between the water pipes coming into the cabinet and the riser tubes going up to the faucet itself. There should be one for both the hot and cold supplies. Shut off the water by turning the knobs clockwise until they stop. Be sure to turn off both supplies even if you're fixing just one handle, for two reasons: 1. The hot and cold aren't always as separate as they appear, and 2. Once you succeed at fixing one valve, it's a good idea to replace the same parts in the other handle, because you just learned how to do it and because the other one is likely to go bad soon anyway. Plus, it's nice when both handles feel the same when you turn them off.
If you don't have shutoff valves under the sink, you can turn off the water to the entire house at the main shutoff valve, typically located in the basement or crawlspace, although it could be at your water meter outside. If you're a renter, call your landlord (the person who should be fixing the faucet in the first place).
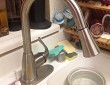
Disassemble the Faucet
Open the faucet handle(s) to make sure the water's completely shut off, then look for a screw or setscrew that secures the handle; it could be under a decorative plastic cap, which you can simply pry off with a flat screwdriver or utility knife. Remove the handle to see what's underneath. This is where the instructions get murky, as there's no telling what type of faucet you have. But don't worry; you'll be master of your own model in no time.
If it's a single-handle faucet and has a dome-shaped cap under the handle, unscrew the cap to remove the spout and access the valve parts. With other faucet types, there might be a plastic cartridge that simply pulls out (or is possibly held by a retaining nut of some kind), or a disc-type cartridge that's secured with screws. If the faucet has two handles, it probably uses cartridge valves or it's an old-style compression faucet with a metal spindle that moves up and down when you turn the handle.
Keep removing pieces (remembering where they came from and how they were positioned), paying special attention to anything made of rubber or any other part the seems to control the flow of water. The rubber parts are what create the seals and are most likely what's causing your leak. These could be little rubber cups (usually accompanied by tiny springs) that fit into cavities and/or O-rings that seal around the outsides of cartridges and other parts.
Compression faucets have an O-ring or two around the spindle and a rubber washer on its bottom end. It it's really old, it could have something called packing string under the nut that secures the spindle. The string does the same thing a rubber washer would do. After removing the spindle, stick your finger into the hole where the spindle was and feel the little metal cup inside. If this feels rough or misshapen, remember to pick up new valve seats and a seat wrench at the store, as the old seat for each valve must be replaced.
Find New Parts
Collect all the little internal parts in a baggie (you can leave the handle and spout at home) and head to your favorite hardware emporium. If you know the model number of the faucet, great. But chances are you'll know nothing more than the manufacturer, and that's a start. A good store staffer will help you find what you need. Faucet manufacturers offer replacement cartridges and faucet repair kits for specific models; these are your best bet. Otherwise, look for matching aftermarket parts, or barring that, generic washers, O-rings, and seals that look exactly like your originals (close doesn't count with faucets). Finally, pick up a small tube or can of waterproof/heatproof grease for lubing the rubber parts to facilitate reassembly.
Finish Up
Back at the ranch, carefully reassembly the faucet just like it was before. Use a light coating of grease on O-rings for spouts and those that fit around cartridges and spindles, but you shouldn't need it for rubber cups or any hard plastic parts. Tighten everything firmly but not too tight. When everything's back in place, turn on the water by slowly opening the shutoff valve counterclockwise. Congratulations, you just saved yourself about 150 bucks.
Now, about that car problem…


Looking for a Pro? Call us (866) 441-6648

Plumbing Average Costs
Plumbers Experiences
My Remodeled Bathroom Is Modern, Clean And Beautiful
Four Essential Points That Helped Me Install The Best Toilets