DIY Tutorial: Painting a Decorative Planter
 Throughout the dreary winter months, we miss the lush green of summer. The addition of foliage into our living spaces will breathe new life into a room. Indoor trees are readily available at local garden centers. But the bigger challenge is the container.
Containers come in all sizes, shapes and colors. The prices are equally variable. But, with the magic of paint, you can transform a lightweight and inexpensive planter into what appears to be a very pricey decorative accessory. Just follow these easy instructions:
1) Find a lightweight plastic or fiberglass pot. Don’t worry about the color because you have the option to change it. Just pay attention to the size and shape. It should be the appropriate size for your plant and a shape you find aesthetically pleasing. To avoid a mess, get a pot that is large enough to hold the drainage pan inside. This way, you will be assured that water and residue will not end up on your carpet or hardwood floors.
2) Prep the container. Lightly sand to rough up the surface and apply a spray primer for complete coverage. Be sure to include a few inches inside the pot and under the lip since this area will also be visible. Any time products are sprayed, it is best to do it in a well-ventilated area. To avoid drips, hold the can a foot or more away from your project. Keep your hand moving as you spray. Think of “lightly dusting” the project.
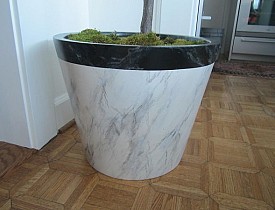
3) Paint your pristine canvas in any way that will complement your décor. The options are endless. You may choose to keep it simple and merely change the color. If you are more adventurous, there are kits available to make your container look like granite, stone, terracotta or metal. You could be even more courageous and go with your own idea. Add embellishments such as stamps, hand-painted designs or any other decorative painting technique.
4) Choose the right product. If you are adding texture, be sure to use a latex-based product. Both fiberglass and plastic will have some “give.” If the texture is not latex (like sheet rock mud or plaster) it will crack when moved.
5) Choose the right sheen. Depending upon the finish you choose, the sheen of your topcoat may be a factor as you create your illusion. A matte or flat sheen is typical for surfaces that appear to be stone, aged metals or terracotta. High gloss is preferred for the appearance of polished marble or glazed ceramics. For even consistency, these can be applied with a foam roller or spray.
6) Insert your plant. Now, all that is left is to insert your plant and potting soil and select the perfect spot to place it in your room. If you can see the inside of the pot, add a layer of Spanish moss or even some additional draping plants to fill in as a disguise for the gap around the top.
Kass Wilson writes for Networx.com.
Updated July 31, 2018.
Looking for a Pro? Call us (866) 441-6648

Painting Average Costs
Painters Experiences

When You’re In No Shape To DIY, Hire A Contractor For The Job

Exterior House Painting By A Contractor With Feet Like A Fly


