How to Replace a Bathroom Vanity
 Learning how to replace a bathroom vanity cabinet is a fairly easy DIY project with basic, straightforward plumbing work, though it does take careful planning. In shopping for a vanity, balance the convenience of installation with aesthetics and convenience of use. Weekend warriors should try to line up the cabinet with studs, pipes and drain, which will make installation simple. I learned this the hard way.
Here's how to replace a bathroom vanity, the right way.
Buy the Right Size Vanity, or Learn the Hard Way
I spent a few months replacing cabinets and vanities in homes that were gutted after Hurricane Katrina. Sometimes, a tile layout made it obvious that the old vanity fit perfectly in the corner. I first thought I would try to replicate the layout with a new, differently shaped vanity, only to learn the plumbing was off-center and a hassle to hook up.
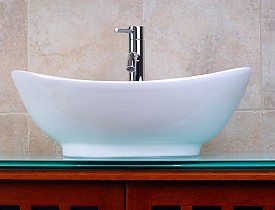
The lesson for most homeowners is to measure the space and buy an appropriately sized vanity. It's much easier than finding a unique and oddly sized vanity and trying to shoehorn it into the space. In a small bathroom, make sure the vanity is not too deep for the space. Also don't buy something too wide or narrow. Most importantly, center the sink in front of the drain pipe.
Make Sure the New Vanity is Level
Make sure your vanity is level, even if tile or other flooring is already cut around the old vanity shape. I also learned the hard way that it is easier to double up on shims and elevate the lower side than to try to cut tile and drop the raised side.
Be Sure There are Studs Behind the Vanity
Make sure there is at least one stud behind your vanity. Most vanities have a solid board across the back for nailing the backing board to the wall. However, I ran into cases where I had to cut the nailer board for plumbing, making the board weak and unstable. In those cases, I fastened a 2-by-4 by driving in screws through the back edges of the vanity into the ends of the lumber. Then I screwed the 2-by-4 or nailer into the wall studs.
Install the Vanity Countertop Separately. Caulk, Don't Glue
The countertop is typically a separate piece. To cut your workload while cramped underneath the vanity, turn over the countertop and attach your drain pipe, including trap, and attach the supply lines to the faucets. Then run a bead of caulk around the top of the cabinet and flip your sink onto the cabinet, pushing it tight against the wall, and adding more caulk between the countertop and wall. My final "learned the hard way" tip: Liquid Nails and other construction glues are unforgiving. If you need to replace either the cabinet or sink later, it is relatively easy to cut a line of caulk, but you can rarely separate two surfaces stuck together with heavy-duty glue.
Finally, Hook Up the Plumbing
If the pipes line up correctly, the plumbing is very straightforward. Attach the flexible hot and cold supply line hoses to their respective pipes, then attach the drain fixture straight back into the drain pipe (and make sure to add a washer to help prevent leaks). Plan ahead, learn from my mistakes and pre-attach your plumbing.
Installing a vanity can be simple and straightforward. If you consider anything to do with plumbing less than simple and straightforward -- or you're just short on time -- find a licensed plumber to install the vanity for you.
Updated December 3, 2018.


Looking for a Pro? Call us (866) 441-6648

Plumbing Average Costs
Plumbers Experiences

Neglecting A Leak Led To A Roof Replacement
A Modern, Nice-looking Bathroom Remodel Also Adds Value To Our Home