How To Install A Home Water Filter

Tap water contamination is a serious issue, even in countries like the U.S. and Canada. If you are concerned about heavy metals, chemical compounds or bacteria in your tap water, a home water filter is often the best solution. Since there are many different filter types available, this article provides instructions for how to install each one.
What Types Of Home Water Filters Are There?
Strictly speaking, water filtration describes the removal of dissolved solids from water by means of a physical barrier or with the help of a biological or chemical process. The common types of home water filters are:
- Faucet, Countertop, Showerhead and Refrigerator Filters utilize carbon filtration -- that adsorbs mainly larger particles, chlorine, and volatile organic compounds -- in combination with sediment and coconut shell filters.
- Reverse Osmosis Systems also combine different pre- and post-filter stages with carbon filtration and in addition, a semi-porous membrane capable of removing up to 99% of all remaining contaminants.
Ultraviolet light systems, water ionizers, and distillers are not considered water filters. UV light might kill pathogens, but does not remove them from water. The same applies to water ionizers, which only change the chemical makeup of water. Last but not least, distillers separate water molecules from other substances by means of heat and evaporation.
Water Filter Installation
When it comes to installing a water filter system in your kitchen or elsewhere in your home, you may be able to do it yourself. With some filter types, the setup doesn't take more than 5 minutes (that's a promise!) even if you've never used a wrench before.
For other filters, however, unless you know exactly what you are doing, you’ll need to hire a plumber for professional installation, since permanent changes to the plumbing system need to be made.
Filters That Don't Require Professional Installation
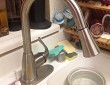
- A faucet-mounted filter is directly attached to your kitchen faucet. Installation is straightforward and quick:
- Remove the aerator (and washer) from your faucet.
- Attach an adapter if necessary. Most filters have internal threading, which means that you can easily attach them to a faucet with external threading. If your faucet, however, has internal threading, you’ll need an adapter (which is usually provided with the filter).
- Attach the filter itself and hand-tighten.
- Countertop filters come with an additional water line that must be attached to the faucet:
- Remove the aerator (and washer) from your faucet.
- Screw on your filter's diverter valve. Again, use an adapter if needed.
- Turn on the cold water and rinse your filter for about 5 minutes.
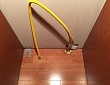
- Showerhead filters are primarily used to remove chlorine and other disinfecting byproducts. To install one in your shower, here's what you need to do:
- Remove your old showerhead. Use a wrench, if it sits really tight.
- Replace any worn-out Teflon tape. Be careful to wrap the new tape in the same direction as you later tighten the new showerhead.
- Attach the new showerhead filter with the rubber washer in place to prevent leakage.
- Tighten the showerhead with a wrench if necessary.
- For refrigerator water filters, there is no one-size-fits-all approach to installation. In-grille filters are fairly easy to replace without the need for tools.
Filters That May Require Professional Installation
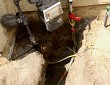
An undersink reverse osmosis system is more complicated to install. If you are new to DIY, hire a licensed plumber for this particular project. However, if you are very skilled and experienced, you might want to give it a try.
Assemble all the necessary tools, including a tubing cutter, adjustable wrench, screwdriver, and 1/2" or 1/4" drill bit. All other components should be included in the product's installation kit.
Follow this basic installation procedure, which may differ from one RO system to the next. Find more detailed instructions here:
- Install the extra faucet by drilling a hole in your kitchen sink or countertop.
- Drill a second hole in the sink drain line and attach the drain saddle.
- Install the inlet feed water valve. First, turn off the cold water supply. Release any remaining pressure by opening the faucet. Remove the cold water line and add your filter's feed valve adapter. Reattach the cold water tubing.
- Set up your reverse osmosis module, following the manufacturer's specific instructions precisely. Place filters and membranes in their housings.
- Turn on the water supply and flush the system.
This post was written for Networx by Gene Fitzgerald of BOS.


Looking for a Pro? Call us (866) 441-6648

Related Experiences
Gas Line Installation Made Simple
Hire A Meticulous, Highly Professional Plumber For Peace Of Mind