Building the Perfect Cold Frame
 If you live in a region with a short summer growing season, cold frames allow you to plant earlier in the spring and to extend the harvest season. But remember: for a cold frame to be effective, you have to choose cold-hardy plants to grow in it.
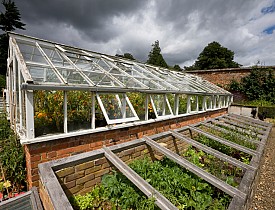
What is a Cold Frame, and What Does It Do?
Cold frames help regulate temperature (it's not unusual for it to be 10ºF or more warmer inside one), but their main purpose is to allow gardeners to shelter plants from the wind, rain, snow and other inclement weather that comes in the fall and winter.
Keep in mind that cold frames won't enable significant winter growing of crops; they will mainly extend the harvest season of crops which are almost or already mature by the end of fall. That's enough information to get the avid DIY-er started on a carpentry project.
Select Materials for the Walls and "Light"
There are 2 parts to the cold frame: the sides and the top cover, or "light." If you can find an old storm window to use as your light, that's great. If not, use panels of glass, plastic, fiberglass, or other transparent material. You may affix multiple light panels to a single, extended cold frame if you wish. Plot the dimensions of your cold frame to match the size of your light, so it will be able to rest on top. Try to find panels with as few crossbars as possible to allow rain to run off. For the sides, use any readily available material, such as wood panels or cinder blocks, but take into consideration how you plan to use your cold frame before you gather materials.
Options like whether you intend on moving your box around or keeping it from year to year in the same spot will determine which type of material is best. Design your cold frame to be any length you wish, running along an east-west axis. It can also be as tall as you desire, but should not be more than a couple of inches above the fully-grown height of the crops it will house. The back or northern wall should be a few inches taller than the front or south-facing wall to allow an angle towards the south, since the south side receives the most sun exposure in winter. Keep the angle low so that the light merely grazes the tops of your crops by a couple inches at most.
How-to Guide
Here is a shorthand guide to constructing your own traditional 4-by-8 foot cold frame, as described by Elliot Coleman in his excellent book Four-Season Harvest.
In addition to the light, you'll need:
- two 8-foot-long 2"x12" boards
- one 8-foot-long 2"x8" board
- one 4-foot-long 2"x2" board
Cut a 2"x12" board in half; then cut the two halves diagonally so that each one is tapered, 12" high on one end and 8" high on the other.
Cut a 2"x2" notch in the center of the other two boards, the 2"x8" and the 2"x12". This notch is where the 2"x2" will lie to support the light. Nail these boards together on a flat surface, with the cut edges of the two side boards facing up and the notches on the other two boards facing down.
Turn the frame over and nail the 2"x2" across the frame, into the notch. It is a good idea to build a lip around the top edge of your frame so that wind can't easily blow your light off. If your light material is lightweight and you experience windy weather, you'll want to clip it down.
Updated September 5, 2018.


Looking for a Pro? Call us (866) 441-6648

Landscaping Average Costs
Landscapers Experiences
No Budget For A New Deck This Year? Try This Affordable Option
I Built A Concrete Retaining Wall As A Defense Against El Nino