How Home Insulation Can Save You Money

Photo: Tom Raftery, Flickr.com
As the days grow shorter and colder during these challenging economic times, many homeowners are choosing to save money by heating their homes less. While it may be frugal and energy-efficient to reach for a sweater rather than for the thermostat, once winter sets in, a chilly home interior could progress quickly from discomfort to health hazard, particularly if there are small children or elderly people living there.
Roofers from Boston know that proper home insulation is an excellent way to save money on your heating bill, as well as reducing your carbon footprint. The following tips give you a good start on keeping heat in your home and cash in your wallet.
Getting Started
Check existing home insulation in the your, outer walls, floors, crawl spaces and basements. Note what type of insulation you have in each area, and its condition. It should be clean and free of tears, mold, damp, or pest infestation.
If you find that you need to add or replace insulation, find out the R-value you need. (R-value is the measure of insulation’s ability to resist the flow of heat.) Head over to the Energy Star website’s R-value page to check out recommended R-values for your location. For more information, contact your local building department.
Home Insulation by Area
Once you have determined which places in your home need insulation and how much, it’s time to consider what sort of insulation each area will need.
Attic. Blown-in insulation or fiberglass batts are good for insulating attics. If you wish to install blown-in cellulose insulation, you can hire a professional or rent a blower from a home improvement store near you. If you choose to add fiberglass batts to existing insulation and the old insulation reaches the top of the ceiling joists, lay the new insulation perpendicular to the joists, covering them completely. You can also have a professional blow liquid foam insulation between the rafters.
Walls. In order to insulate exterior walls, “fur out” the wall by applying framing lumber to the inside of the wall. This creates space for adding more insulation. You can use 2x4s, 2x6s or smaller furring strips for this project. Then install the insulation or have liquid foam insulation sprayed between the strips. This method, which is particularly appropriate for solid brick and concrete walls, is a job for a professional.
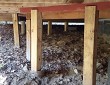
Floors. It’s important to set up a proper moisture barrier for this project. If you live in a cold climate, where moist air tends to move from the inside to the outside, place the vapor barrier side of the insulation against the floor to protect the insulation against moisture coming from the house. In a warm climate, the vapor barrier should face downward toward the crawl space (if there is one) to prevent any moisture there entering the insulation.
Windows. Consider installing double-glazed windows, window film insulation and weatherstripping around windows and doors in order to stop heat escaping.
Safety First
Make sure to keep the insulation from touching any wiring. As you work in these rarely-seen spaces of your home, you may discover things that you would not have seen otherwise, such as wiring that has frayed or broken entirely. If you do, call an electrician to fix the problem before going any further with your project.
Updated October 30, 2018.


Looking for a Pro? Call us (866) 441-6648

Roofing Average Costs
Roofers Experiences
Our Wooden Deck Refinishing: No More Splinters!
New Ladder Installation Will Make Halloween Less Scary This Year